Built-In macOS Window Management Tools
July, 2023
It is a truth universally acknowledged that a person transitioning from novice computer user to so called a “power user” begins to believe that managing the windows on their screen with a mouse is somehow pedestrian and inefficient and that managing them with a keyboard is obviously superior. Apps that help you do this range from the simple, like Rectangle or Moom, to the extremely complex, like Yabi or Hammerspoon. I can’t help but feel like one of the reasons people go down this road is because they’re not fully aware of macOS’s built-in window management tools.
(The mouse vs. keyboard debate is as old as the mouse itself. If you’re interested in diving pretty deep down that rabbit hole there’s a useful set of links at the UX Stage Exchange.)
Sure, everyone knows the basics, like how to drag windows around, minimize them, etc; a few people know how to use Mission Control; and a very small number of brave souls actually like using Stage Manager (shhh… don’t tell the “power users” that it is actually very good). But there are a few undocumented tricks that make managing windows much easier:
Window Edges
You can resize windows from any edge or corner. This is well known, but you should also know that the shift and option modifiers change how windows resize. The shift modifier resizes windows keeping the window’s ratio intact. The option modifier resizes opposing sides/corners symmetrically. And you can combine them.
You can also double-click on any window edge and that edge/corner will expand to the screen’s edge/corner. You can use the option modifier with this as well, for example you can press option and then double-click on the left edge of a window and both left and right sides of the window will resize to the edges of the screen.
Click-Through
App windows do not need to be active for you to be able to scroll them. For example, you can scroll a Safari window in the background by just hovering over it and scrolling.
If you hold the command modifier all your mouse clicks will work on inactive windows. In this way you can move inactive windows around without activating them, and you can even interact with inactive apps (for example: switching tabs, clicking buttons, etc).
App Switcher
You bring up the App Switcher by typing command tab. Keep the command key held down and press tab to cycle through apps. This is a very quick way to switch between applications. The mouse works on this pop-up as well.
But the App Switcher has some tricks up its sleeve. If you type Q the app highlighted in the switcher will quit, H will hide the app, if you type the up or down arrows (or the number 1 for some reason) you will be shown all that app’s windows (and sometimes recent documents). You can also drag files onto apps in the switcher.
The Green “Traffic Light” Button
Pressing the window’s green “traffic light” button expands the window into a full-screen Mission Control desktop space. People unfamiliar with using multiple desktops in Mission Control tend to be
enragedconfused by this.Hovering over the green button reveals options to “tile” the window to one side of the screen or another. This lets you use 2 windows in one Mission Control space.
Holding the option modifier while hovering over the green button reveals even more options — for “zooming” the window (more on this below) and moving the window to one half of the screen or another (but not “tiling” it to either half). These are arguably the more useful options and perhaps should be the default.
“Zooming” a window is actually pretty cool. I’ve never met a single person that actually uses this, but basically, every window remembers two sizes: the un-Zoomed size and the Zoomed size. Alt-clicking the green button toggles between these two sizes. The exact logic by which is works has been lost to the mists of time and has simply become legend, no one should attempt to learn all the rules of the magic zoom button, one should simply hope that each click does the right thing (which is usually does) and continue to give thanks to the benevolent yet mercurial macOS gods.
Move Windows From Anywhere
To move a window around you have to grab its toolbar, but there is a hidden setting that allows you to move a window around by dragging anywhere in the window (apparently this is pretty common in Linux). Just run
defaults write -g NSWindowShouldDragOnGesture yesin the terminal (you might have to log out and back in) and then press control and command and drag any window from any where.
I have to admit that I lied to you. I do use some keyboard shortcuts for window management. I assign shortcuts to those very obscure, but highly useful, hidden option-modified green button actions. In “System Preferences > Keyboard > Keyboard Shortcuts > All Applications” I set:
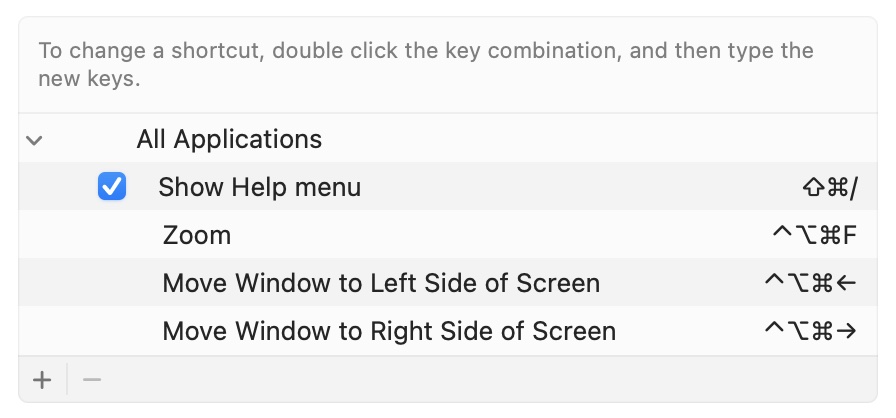
Since doing that I deleted all my window management apps and happily use the built-in tools.
P.S. The “Show Help menu” shortcut pictured above is one the most useful shortcuts you can learn. With it you can use the keyboard to run any action in any app’s menubar — Ok, I’ll admit it, I love keyboard shortcuts.